Monday, November 30, 2009

Love And Sweepstakes!


How many times have you needed an alphabet set that wasn't too big, or too small? I know that has been my predicament more than once. Well, this month MFT has taken care of the problem for all of us, AND in MFT's special font we have all been dying to get a hold of. I have two projects to show you great ways to use this versatile alphabet set.

Since every year for Christmas I scrap two calendars for presents, I thought this would be the perfect opportunity to showcase the new alphabet set, and what a better way than to celebrate my daughter's first band review....and the band won the sweepstakes award!! Yahoo!

Since, Sarah's birthday falls in November, so I did a fall theme by using some Walmart designer paper I've had in my stash for years and used my Stampin Up! color coach to make sure those colors would match the band's uniforms as well. After stamping the letters in memento blue and cutting them out, I used my trusty fingernail to slightly distress the outsides a bit, then did the same with the punched out caramel layers to match. The typed journaling is a MS Word font I chose to get as close as possible to MFT's alphabet font.

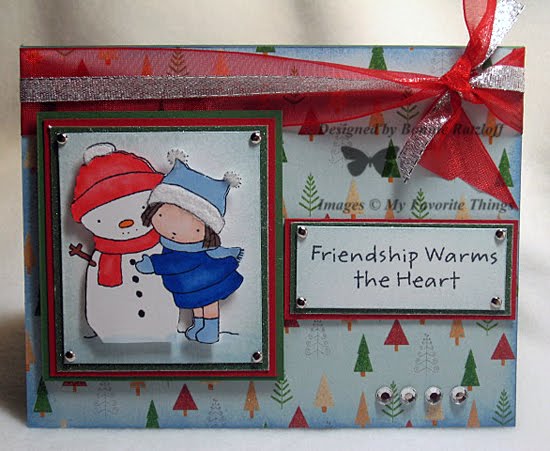
My second project showcases not only the alpha set, but also pairs it up with one of the cute Pure Innocence girls coming out this month. Once again I stamped the alpha in memento blue, then cut them out this time layering over punched out snowflakes using a Martha Stewart snowflake punch. So not only can they be used to scrapbook with, but also used on cards as a saying. You are definitely going to have to have this set!

For a list of DT and December Temp DT previewing this set, see Kim's blog and leave these talented ladies some love.


Stamps: MFT Alphadots, Pure Innocence Merry Kissmas
Ink: Memento Tuxedo Black, Blue, Stampin Up! Tempting Turquoise
Cardstock: Walmart Designer Paper, DCWV Winter Mat Stack, Stampin Up! Creamy Caramel, Tempting Turquoise, MFT Perfect Panels
Accessories: Prismacolor Markers, Dimensionals, Circle Punch, Martha Stewart Snowflake Punch, Martha Stewart Ribbon Bow, Glue Dots, Calender, Gem Stickers, MFT Santa Baby Braddies, Sponge

Sunday, November 29, 2009

Pure Innocence - Snow and Stripes


Last month everyone fell in love with these adorable little girls, and this month will be no exception; so get your credit cards warmed up and your fingers ready to one-click!

Today I have two cards to share with you showcasing two different Pure Innocence girls. The first one is called Merry Kissmas and the second is Heart Stripes.
For my first card, I stamped my main image twice on MFT perfect panels and then cutting one image out after coloring to pop up on dimensionals later. White fun flock was also added to both the snowman and girl's hats for added dimension.

For my second card, the main image was stamped only once on MFT perfect panels, colored with grass details being added using a Stampin Up! marker. Stampin Up! bashful blue & garden green dye inks were sponged around my little girl and the grass to fill in any white spots. The heart ribbon is from Michaels $1 spot and the brads are MFT Santa baby braddies.
For a list of DT and December Temp DT members previewing these sets today, stop by Kim's blog and leave these talented ladies some love.
Stamps: MFT Pure Innocence Heart Stripes & Merry Kissmas
Ink: Memento Tuxedo Black, Stampin Up! Bashful Blue, Garden Green, Soft Sky
Cardstock: MFT Perfect Panels, DCWV Sweet Shoppe, DCWV Winter Mat Stack, Stampin Up! Rose Red, Garden Green, Real Red
Accessories: Prismacolor Markers, Sponges, Ribbon, MFT Santa Baby Braddies, Dimensionals, Heart Sticker, Gem Stickers, Fun Flock, Stampin Up! Markers

Saturday, November 28, 2009

Truffles For Flopsey


Well, Kim's done it again and has created the cutest Flopsey set ever! Of course, I say that each time a new Flopsey set comes out since each new one seems to be better than the last. This month, our dear friend is delivering his favorite food and it's not carrots. What is it you ask? Well, chocolate of course, and not just any chocolate....truffles to be specific!

To help Flopsey deliver his truffles to his true love, I stamped him on MFT's perfect panels in Memento Tuxedo Black ink twice, coloring with Prismacolor markers, then cutting out one image to pop up on dimensionals. After lightly sponging Stampin Up! Pretty In Pink dye ink around the edges of the main image panel and layering, I added MFT's Chocolate Kiss paper to an A2 scalloped cut card before finishing off with primas, brads and a ruffled Stampin Up! ribbon.

For some added fun, I stamped a matching envie to mail my card in. Here's a look at the inside of the card with a matching box of truffles for Flopsey to send.

For a list of DT and December Temp DT members previewing this set today, stop by Kim's blog and leave these talented ladies some love.


Stamps: MFT Truffles For Flopsey
Ink: Memento Tuxedo Black, Stampin Up! Pretty In Pink, Close To Cocoa
Cardstock: MFT Perfect Panels, Stampin Up! Chocolate Chip, Pretty In Pink, MFT Chocolate Kiss DP, A2 Scalloped Card
Accessories: Prismacolor Markers, Ribbon, Brads, Dimensionals, Primas, Glue Dots, Stipple Brushes

Love, Love And More Love


Hello MFT DT and Junkies alike!! Dust off your credit cards folks because you are so going to want EVERYTHING again this month. First, thank you Kim for giving me this wonderful opportunity to be a part of December's Temp Design Team and Jody for putting up with my questioning whether she and I were really having that conversation or not. :)

Today I'm previewing the new Amanda Baird set Love At First Sight, and oh, is this set soooooo much fun! The girl in the set reminded me of my daughter whenever she talks about the Jonas Brothers, or her boyfriend, and the gleam she gets in her eyes. So I figured why couldn't the girl be the same way about chocolate?

Using that idea as my inspiration, I pulled out my Die Cuts With A View Sweet Shoppe mat stack and got to work by first stamping my images on MFT Perfect Panels in Memento Tuxedo Black and colored everything with Prismacolor Markers; then cutting out two sets of chocolate hearts to pop up on dimensionals later. Once my card was assembled, I added an organdy ribbon and a chocolate kiss button to finish it off.

For my second card, I used the two dogs (they remind me of Lady & The Tramp) stamp with some Die Cuts With A View Paw Prints mat stack paper again stamping the images twice on MFT perfect panels with one being cut out and popped up once they were colored with prismacolor markers. Heart shaped brads, a cream colored organdy ribbon and faux stitching finish off the card.


Stamps: MFT Love At First Sight
Ink: Memento Tuxedo Black
Cardstock: MFT Perfect Panels, DCWV Sweet Shoppe & Paw Prints Mat Stacks, Stampin Up! Rose Red, Real Red, Chocolate Chip, Basic Gray
Accessories: Brads, Prismacolor Markers, Ribbon, Dimensionals, Chocolate Kiss Button, Glue Dots, Thread, Black Stampin Up! Marker, Sponge

Tuesday, November 24, 2009

Flopsey's Thanksgiving Dinner


I have another fun card for you today. Since Thanksgiving is only a couple of days away, I thought it would be fun to show Flopsey cooking.

I first started by by stamping multiple backgrounds using the MFT set Branch Out, then sponging Stampin Up! pumpkin pie ink around the edges of the card and garden green layer. My main image was stamped twice on MFT perfect panels and colored with prismacolor markers, with only the pie, and chef's hat being cut out then popped up on mini pop dots.

Instead of having a ribbon bow across the middle, I pulled out a Martha Stewart Thanksgiving border punch that I bought at Michael's on clearance for just $4.00! So, punched out behind Flopsey is a complete Thanksgiving feast while Chef Flopsey holds the pie.

Here is a close up of our famous chef and his pie.


On the inside of the card I also punched out another part of the feast; this time pulling the pieces a little bit away from the card to make them stand out before stippling with pumpkin pie ink.


Stamps: MFT Sweetie Pie Flopsey, Branch Out
Ink: Memento Tuxedo Black, Stampin Up! Pumpkin Pie, Garden Green
Cardstock: Stampin Up! Pumpkin Pie, Garden Green, MFT Perfect Panels
Accessories: Prismacolor Markers, Mini Pop Dots, Stipple Brushes, Martha Stewart Punches, Felt Pumpkin Ribbon, Dimensionals

Friday, November 20, 2009

Think Snow!


Hello again. Sorry it's been so long since I've posted, but I've been fighting a blasted sinus infection and it's just not going away. Definitely causing problems with my stamping life and sapping my energy.

The project I have today is one I made for my secret sister's reveal gift and just had a blast making. I used a stamp set from My Favorite Things called Cool Yule. The set is just too cute with a little polar bear, penguin, cardinal, ice cube, and a frozen pond with some sentiments.

First, I stamped the polar bear on MFT Perfect Panels for the card, masked, and then created snowbanks behind him before coloring with Prismacolor markers and stippling Stampin Up! bashful blue ink around the edges then layering. To make my snow banks I tore a piece of scratch paper and lightly stippled Stampin Up! soft sky ink, moving the scrap paper around to keep the banks slightly irregular.

For the main layer of the card, I stamped the snowflakes from MFT's Baby It's Cold Outside in Versamark Aquatic Splash, again stippling Stampin Up! bashful blue around the side lightly before adding a ruffled ribbon and some bling to the centers of the snowflakes. The main image panel is then popped up on dimensionals with diamond ice stickles highlighting portions of the ice for added sparkle.
For the altered calendar I made, I stamped the images again in memento ink, masked, and then stippled the snowbanks just like the card before coloring the images. Since I was placing these images into a plastic sleeve, I decided against any bling or sparkle so the plastic didn't tear.
Both of these projects didn't take hardly any time at all to make, and the calendar would make a great stocking stuffer or Christmas gift for someone as well with the holidays approaching.
Stamps: MFT Cool Yule, Baby It's Cold Outside
Ink: Memento Tuxedo Black, Stampin Up! Bashful Blue, Soft Sky, Versamark Aquatic Splash
Cardstock: Stampin Up! Bashful Blue, MFT SnoCone, MFT Perfect Panels, White
Accessories: Calendar, Prismacolor Markers, MFT Santa Bitty Brads, Dimensionals, Stipple Brush, Ribbon, Bling, Ice Stickles

Saturday, November 14, 2009

To Krump or Not To Krump


According to the Urban Dictionary, krumping began as a form of clown dancing, but has developed into a non-violent outlet for anger and alternative to the street violence seen in many urban areas. The dancing style is fast and agressive involving physical contact between dancers that often looks like a fight. So how does krumping and stamping come together?

Well, that's what this week's So You Think You Can Stamp Challenge is all about: Krumping - Bling it out and make it shout. Well, I did both. I took the competitive nature of the "dance", so to speak, and incorporated it into my idea and design, then added plenty of bling. Since at the holidays, a lot of people try to out decorate their neighbors, or even in-laws, I decided that would become my competition. So I took out my yet un-inked Amanda Baird A Balanced Holiday set and paired it my un-inked Tree Trimming Flopsey set and designed a good old fashioned family feud - Baird's vs Rabbits!

I started by stamping my Balanced Holiday set on white cardstock in memento black ink and then my Flopsey set on MFT perfect panels also in memento black ink before coloring everything with prismacolor markers. Once everything was colored, I cut out the presents, Flopsey and his tree separately. Stampin Up! raspberry ink was sponged around the edges of the main image before gluing the presents down with a Martha Stewart 2-way glue pen. Then I sponged Stampin Up! glorious green ink on the edges of Flopsey's tree before popping it up on micro pop dots. Flopsey has Stampin Up! creamy caramel ink sponged on his edges before popping him up on pop dots.

Me And My Big Ideas gem stickers make up most of the bling on the trees with ice stickles being added to the stars and some of the ornaments. A green/gold organdy ribbon with a button in the center finished off my holiday "feud".

Here's a close up of Flopsey decorating his tree.
Stamps: MFT Amanada Baird A Balanced Holiday, Tree Trimming Flopsey
Cardstock: Stampin Up! Glorious Green, Garden Green, White,
Karen Foster Designer Paper, MFT Perfect Panels
Ink: Memento Tuxedo Black, Stampin Up! Glorious Green, Garden Green, Raspberry
Accessories: Sponges, Micro Pop Dots, Pop Dots, Ribbon, Bling, Button, Gold Cord, Ice Stickles, Prismacolor Markers, Martha Stewart 2-Way Glue Pen

Wednesday, November 11, 2009

Christmas In September - A Tad Late #3


Hello again. This is the third card for my September CCC09 submission over at Splitcoaststampers. I'm in love with this image from Pink Cat Studio. It's another digital image and I think Melissa had too much fun drawing this one.

Once I downloaded and re-sized my image, I colored with prismacolor markers and then stippled Stampin Up! bashful blue lightly around the owls before layering. I used my MFT Santa baby braddies for the corners and pulled some Stampendous Class-A-Peel bling stickers I've had in my stash for who knows how long. After adding an organdy ribbon with gold trim, my card was finished.

Here's a close up of my owls and the detail. Total time for the card - 20 minutes. Clean and simple quite often can be the best way to send greetings to family and friends.


Stamps: Digital Image Pink Cat Studio
Cardstock: Stampin Up! Glorious Green, Real Red, Black, White
Ink: Stampin Up! Bashful Blue
Accessories: Stipple Brush, Computer, Printer, Stampendous Class-A-Peels, Prismacolor Markers, MFT Santa Baby Braddies, Ribbon

Tuesday, November 10, 2009

Christmas In September - A Tad Late #2


Hi! I have another digital image to share with you from Pink Cat Studio. This image is called Lily In Her Winter Coat. I wanted to have a "cool weather" feel so I kept everything in blues.

Once the image was downloaded and re-sized, Lily was colored with prismacolor markers with Stampin Up! soft sky ink lightly stippled around the edges. Using a Martha Stewart icicle border punch, I punched a background border, then stippled Stampin Up! bashful blue ink over it. Snowflakes were punched from additional scrap cardstock to use as embellishments with gem stickers in the center. I also used gem stickers to highlight the buttons on Lily's coat, then added a pre-made ribbon bow.

Here's a close up of Lily showing the detail of the coloring and embellishments.


Stamps: Pink Cat Studio digital
Cardstock: White, Stampin Up! Bashful Blue, Brilliant Blue
Ink: Stampin Up! Bashful Blue, Soft Sky
Accessories: Prismacolor Markers, Brads, Martha Stewart Punches, Glue Dots, Ribbon Bow, Stipple Brushes

Monday, November 9, 2009

Christmas In September - A Tad Late #1


Hello. I'm playing catch up with the Christmas card challenge over at Splitcoast. Over the next few days, I'll be showing you some more of the cards I'll be sending out at Christmas this year.


This is another digital image I've found and am totally in love with. This one is from Pink Cat Studio. Once the image was downloaded and re-sized, the fairy was colored with prismacolor markers with Stampin Up! bashful blue ink lightly stippled around the edges. For some added texture, I dry embossed the card and brilliant blue layers with my snowflake cuttlebug dry embossing folder in my sizzix machine (yes the old red machine). I then pulled out some snowflake brads that have been in my stash for years and some platinum ice stickles to highlight the fairy's dress, wand and hair.


Here's a close up of the fairy.


Stamps: Pink Cat Studio digital
Cardstock: White, Stampin Up! Bashful Blue, Brilliant Blue
Ink: Stampin Up! Bashful Blue
Accessories: Prismacolor Markers, Snowflake Brads, Ice Stickles, Stipple Brush, Cuttlebug Snowflake Embossing Folder, Sizzix

Sunday, November 8, 2009

Secret Sister Pumpkin


Hi there. Isn't this little girl so cute? She's a digital stamp from Pure Innocence. I so love this line. My Favorite Things has introduced this line and has some wonderful stamps with it for sale too.

This little girl is going to my secret sister in her reveal package this week though. Once I downloaded and re sized her, she was then colored with prismacolor markers with Stampin Up! soft sky lightly stippled around the outside edges.

Using one of my Martha Stewart butterfly punches, I punched a couple of small butterflies from Stampin Up! pretty in pink scrap paper and glued them to the side. I decided to add some grass to the bottom of the card before layering and them some Micheal's bridal confetti flowers highlighted with platinum ice stickles.


Stamps: Pure Innocence ditigal
Cardstock: white, Stampin Up! Pumpkin Pie, Always Artichoke, Close to Cocoa
Ink: Stampin Up! Soft Sky
Accessories: Stipple Brush, Prismacolor Markers, Martha Stewart Butterfly Punch, Confetti Flowers, Platnium Ice Stickles, Glue Dots

Santa Baby!


Can you just imagine how to end that sentence?? I sure can, but I'll keep it clean. :) This is my entry for this week's So You Think You Can Stamp challenge - Contemporary. We needed to have clean lines, fresh & modern thinking, so I went with the clean & simple technique.

I stamped the background in Stampin Up! real red, glorious green and garden green on matching cardstock. The main image is stamped in memento black on MFT perfect panels and colored with prismacolor markers. The only embellies are MFT Santa baby braddies, a pre made ribbon bow, buttons, and thread.

I think I'll be giving this to my husband for his Christmas card this year.

Stamps: MFT Santa Baby
Cardstock: MFT Perfect Panels, Stampin Up! Black, Real Red, Glorious Green, Garden Green
Ink: Memento Tuxedo Black, Stampin Up! Real Red, Glorious Green, Garden Green
Accessories: Prismacolor Markers, Glue Dots, Buttons, MFT Santa Baby Braddies, Stampin Up! Thread, Ribbon Bow

Sunday, November 1, 2009

Hippity Hop - Bold With Pop


This week's So You Think You Can Stamp challenge was Hip Hop and bold colors. What to do, what to do? Thanks to soccer games and the parade my daughter's school band and color guard marched in it took me a couple of days to figure out what I wanted make. I decided to focus first on the "hop" and the easiest way to do that is with Flopsy! I pulled out all of my MFT Flopsy sets and finally settled on three: Birthday Flopsy, Coffee With Flopsy, and Cupcake Flopsy. Then focus on the bold, so I pulled out some bright Stampin Up! colors: pixie pink, pink passion, only orange, and a rich regal so saffron to break those brights up a bit.

To use all three of my sets, I needed to make a tall card, or in this case, a long card. I started by stamping all of my Flopsy's twice each and coloring them with prismacolor markers then cutting them out. I then took strips of pink passion, only orange and so saffron cardstock and embossed it with my Big Shot and Argyle Cuttlebug embossing folder. Once everything was dry embossed, I sponged the coordinating ink along the edges of the cardstock before layering and adding brads.

Then I added my Flopsy's popping each one up on dimensionals, then pop dots for added dimension. Prima flowers highlighted with platinum ice stickles and a buttony bow following Joanne's tutorial from her blog finish everything off.


Here are close up's of the Flopsy's:


Stamps: MFT Birthday Flopsy, Coffee With Flopsy, Cupcake Flopsy
Cardstock: Stampin Up! Pixie Pink, Only Ornange, So Saffron, Pink Passion, MFT Perfect Panels
Ink: Memento Tuxedo Black, Stampin Up! Pink Passion, Pixie Pink, Only Orange, So Saffron
Accessories: Sponges, Prismacolor Pencils, Dimensionals, All Night Media Pop Dots, Prima Flowers, Glue Dots, Platnium Ice Stickles, Ribbon, Button, Thread, Big Shot, Cuttlebug Embossing Folder